Operator Interface
The Operator Interface is the operator's screen at the station. Operators use it to give downtime reasons, start and end production and non-production schedules, count and correct production, and complete Tasks. It connects a station to Busroot even where the machine sends no signals of its own.
The Operator Interface is a web page. It runs in any modern web browser on a touchscreen, tablet, PC or phone. Open it from the main menu or from a station row on the Cockpit, or sign a shared shop-floor device in with an access code. For devices, network access and sign-in, see Operator screens and displays.
The station screen refreshes every 15 seconds.
Choosing a station
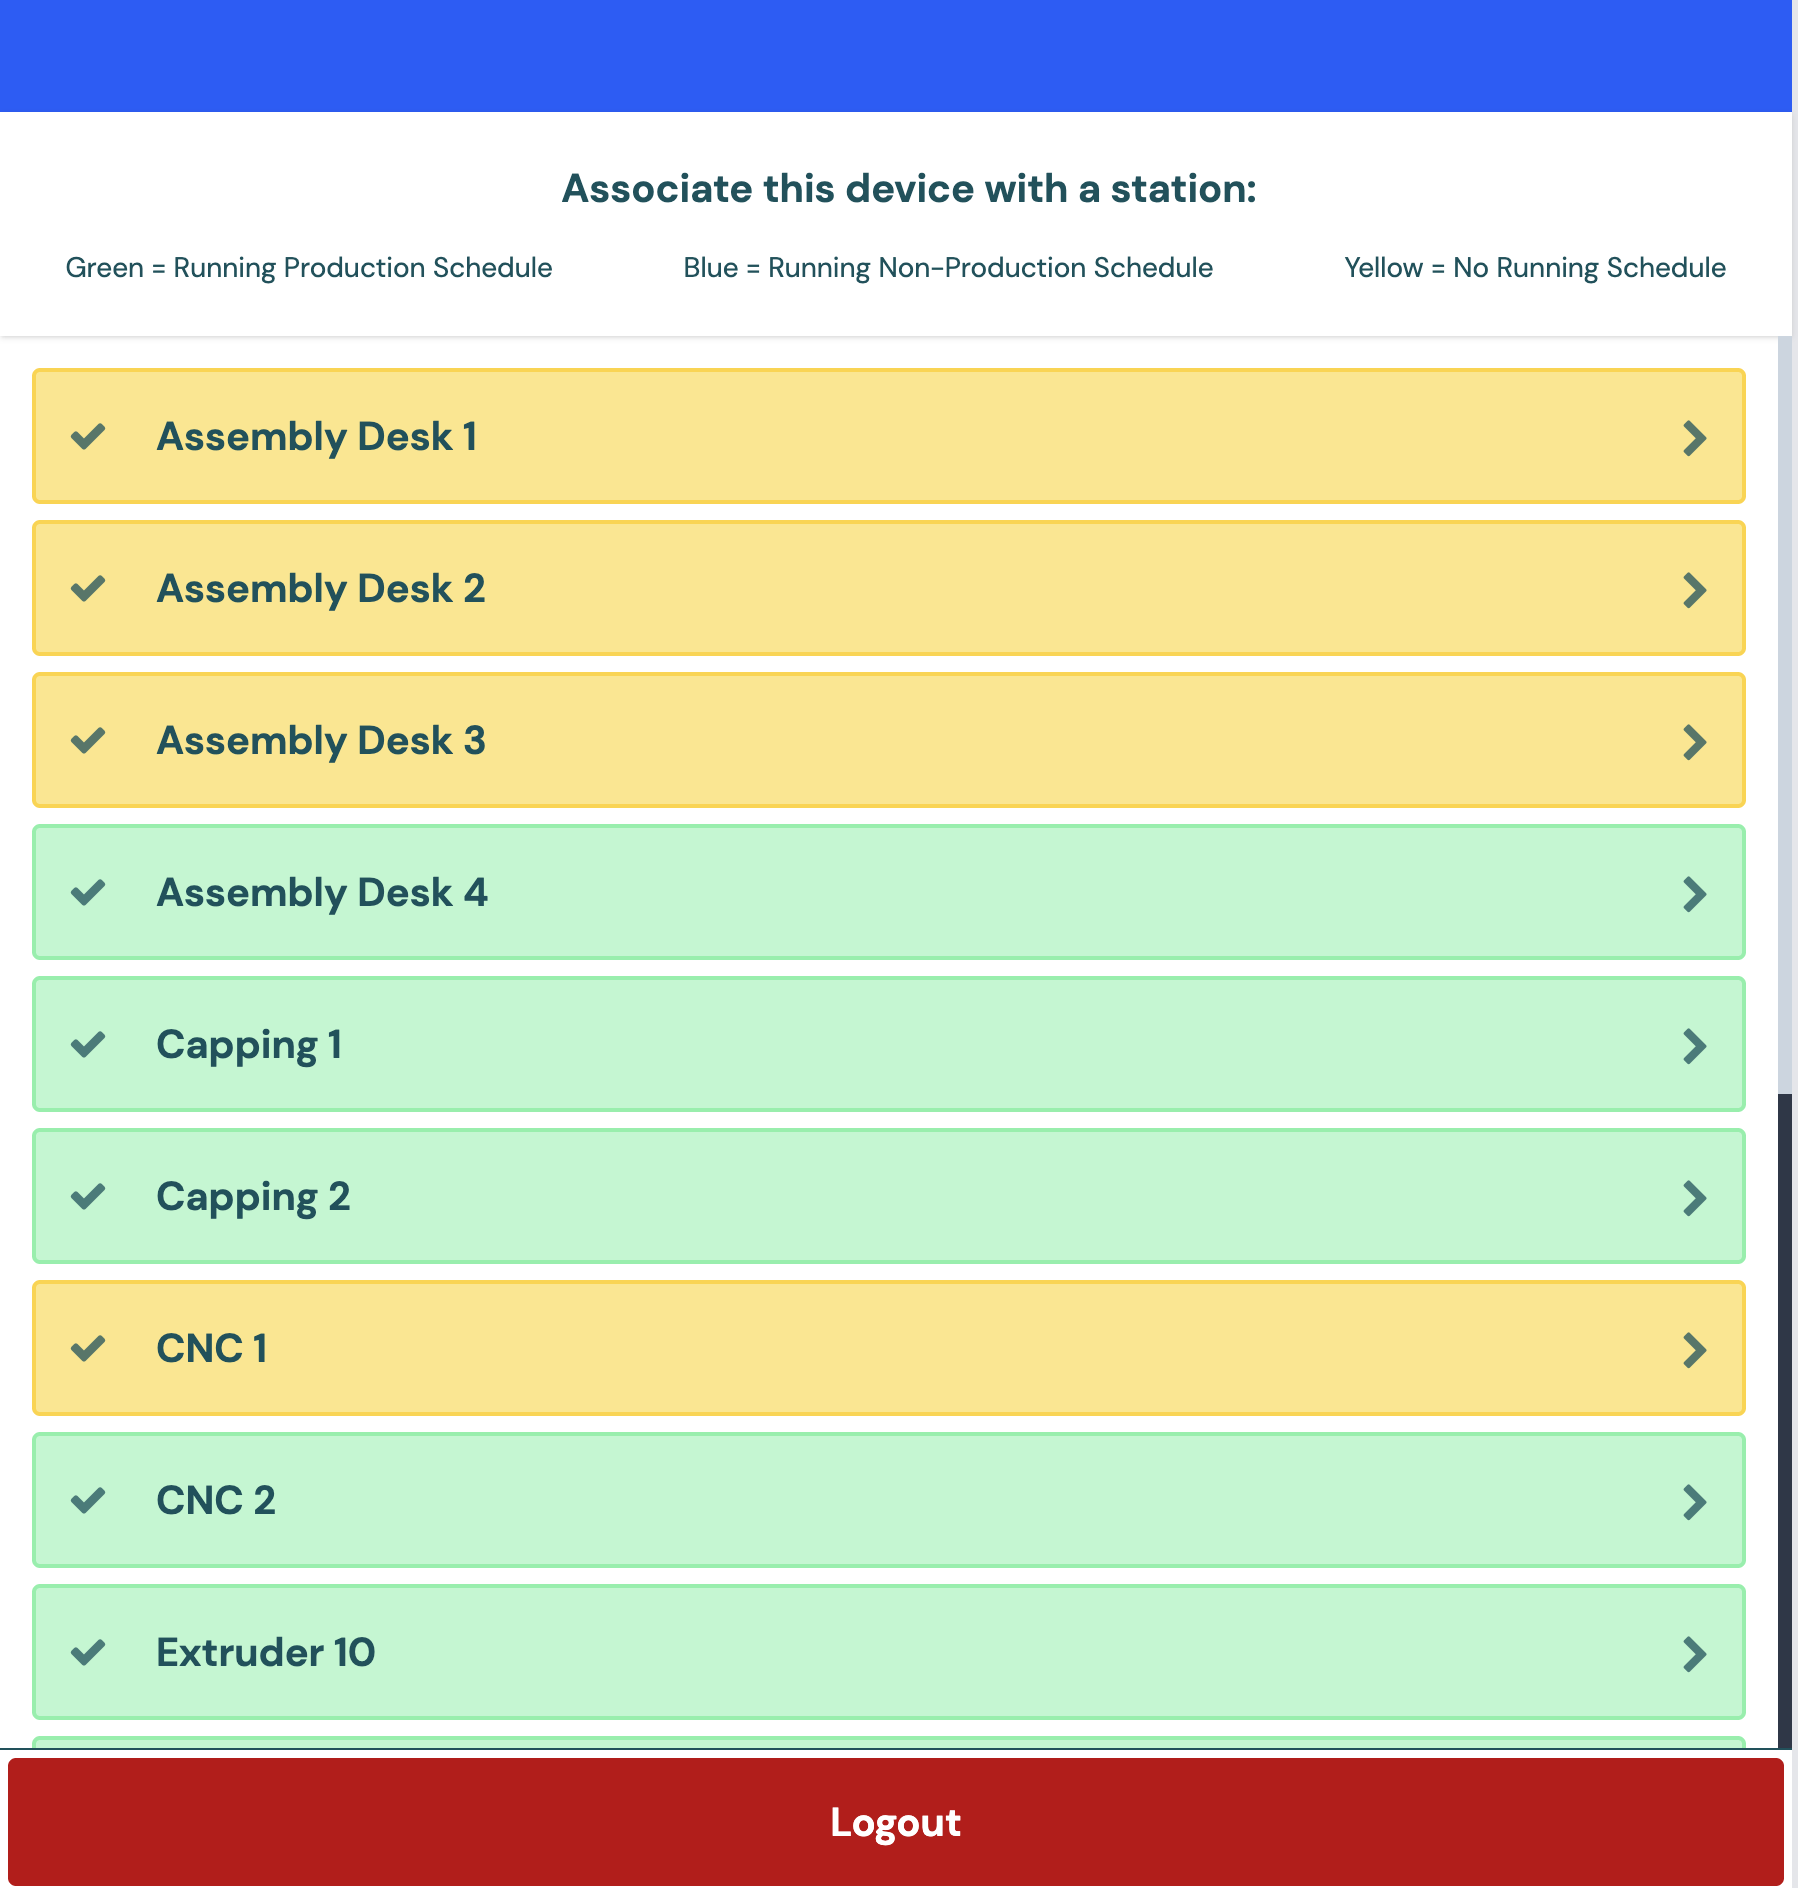
Choose the station the screen is for from the station list. The list is a drill-down, Plant > Station Group > Station. Any step with only one option is skipped, so an account with one plant and one group goes straight to its stations. Only plants and groups that contain a station you can reach are shown.
The screen remembers the plant and group last chosen on it. When you tap the station name to go back to the list, it shows the same station list instead of starting from the top. Pressing Back on a step forgets that choice. The memory stays when an operator signs out, so a screen in a fixed place keeps going back to its own area.
On the station step, each row shows the running schedule's Work Order Ref., SKU and quantity (good / planned), or the reason for a non-production schedule. Rows are coloured by the station's state.
To go back to the station list at any time, tap the station name at the top left.
Operator initials
Once a station is selected, tap the profile icon at the top right to enter the operator's initials. Initials are 3 to 8 letters or numbers. Recently used initials are offered for quick selection.
Initials are optional. When they are entered, Busroot records them with the production, downtime reasons, Tasks and notes the operator enters.
The station screen
The top of the screen shows the station header: the station name, the operator's initials and the latest station note. Below it are status bars:
- Unreported Downtimes: the number of stops that still need a reason, or "No Unreported Downtime". Tap it to give reasons.
- Pending Tasks: where Tasks are in use, the number of Tasks pending, or "All Tasks Completed". Tap it to open the Tasks screen.
The rest of the screen depends on what the station is doing.
Starting a schedule
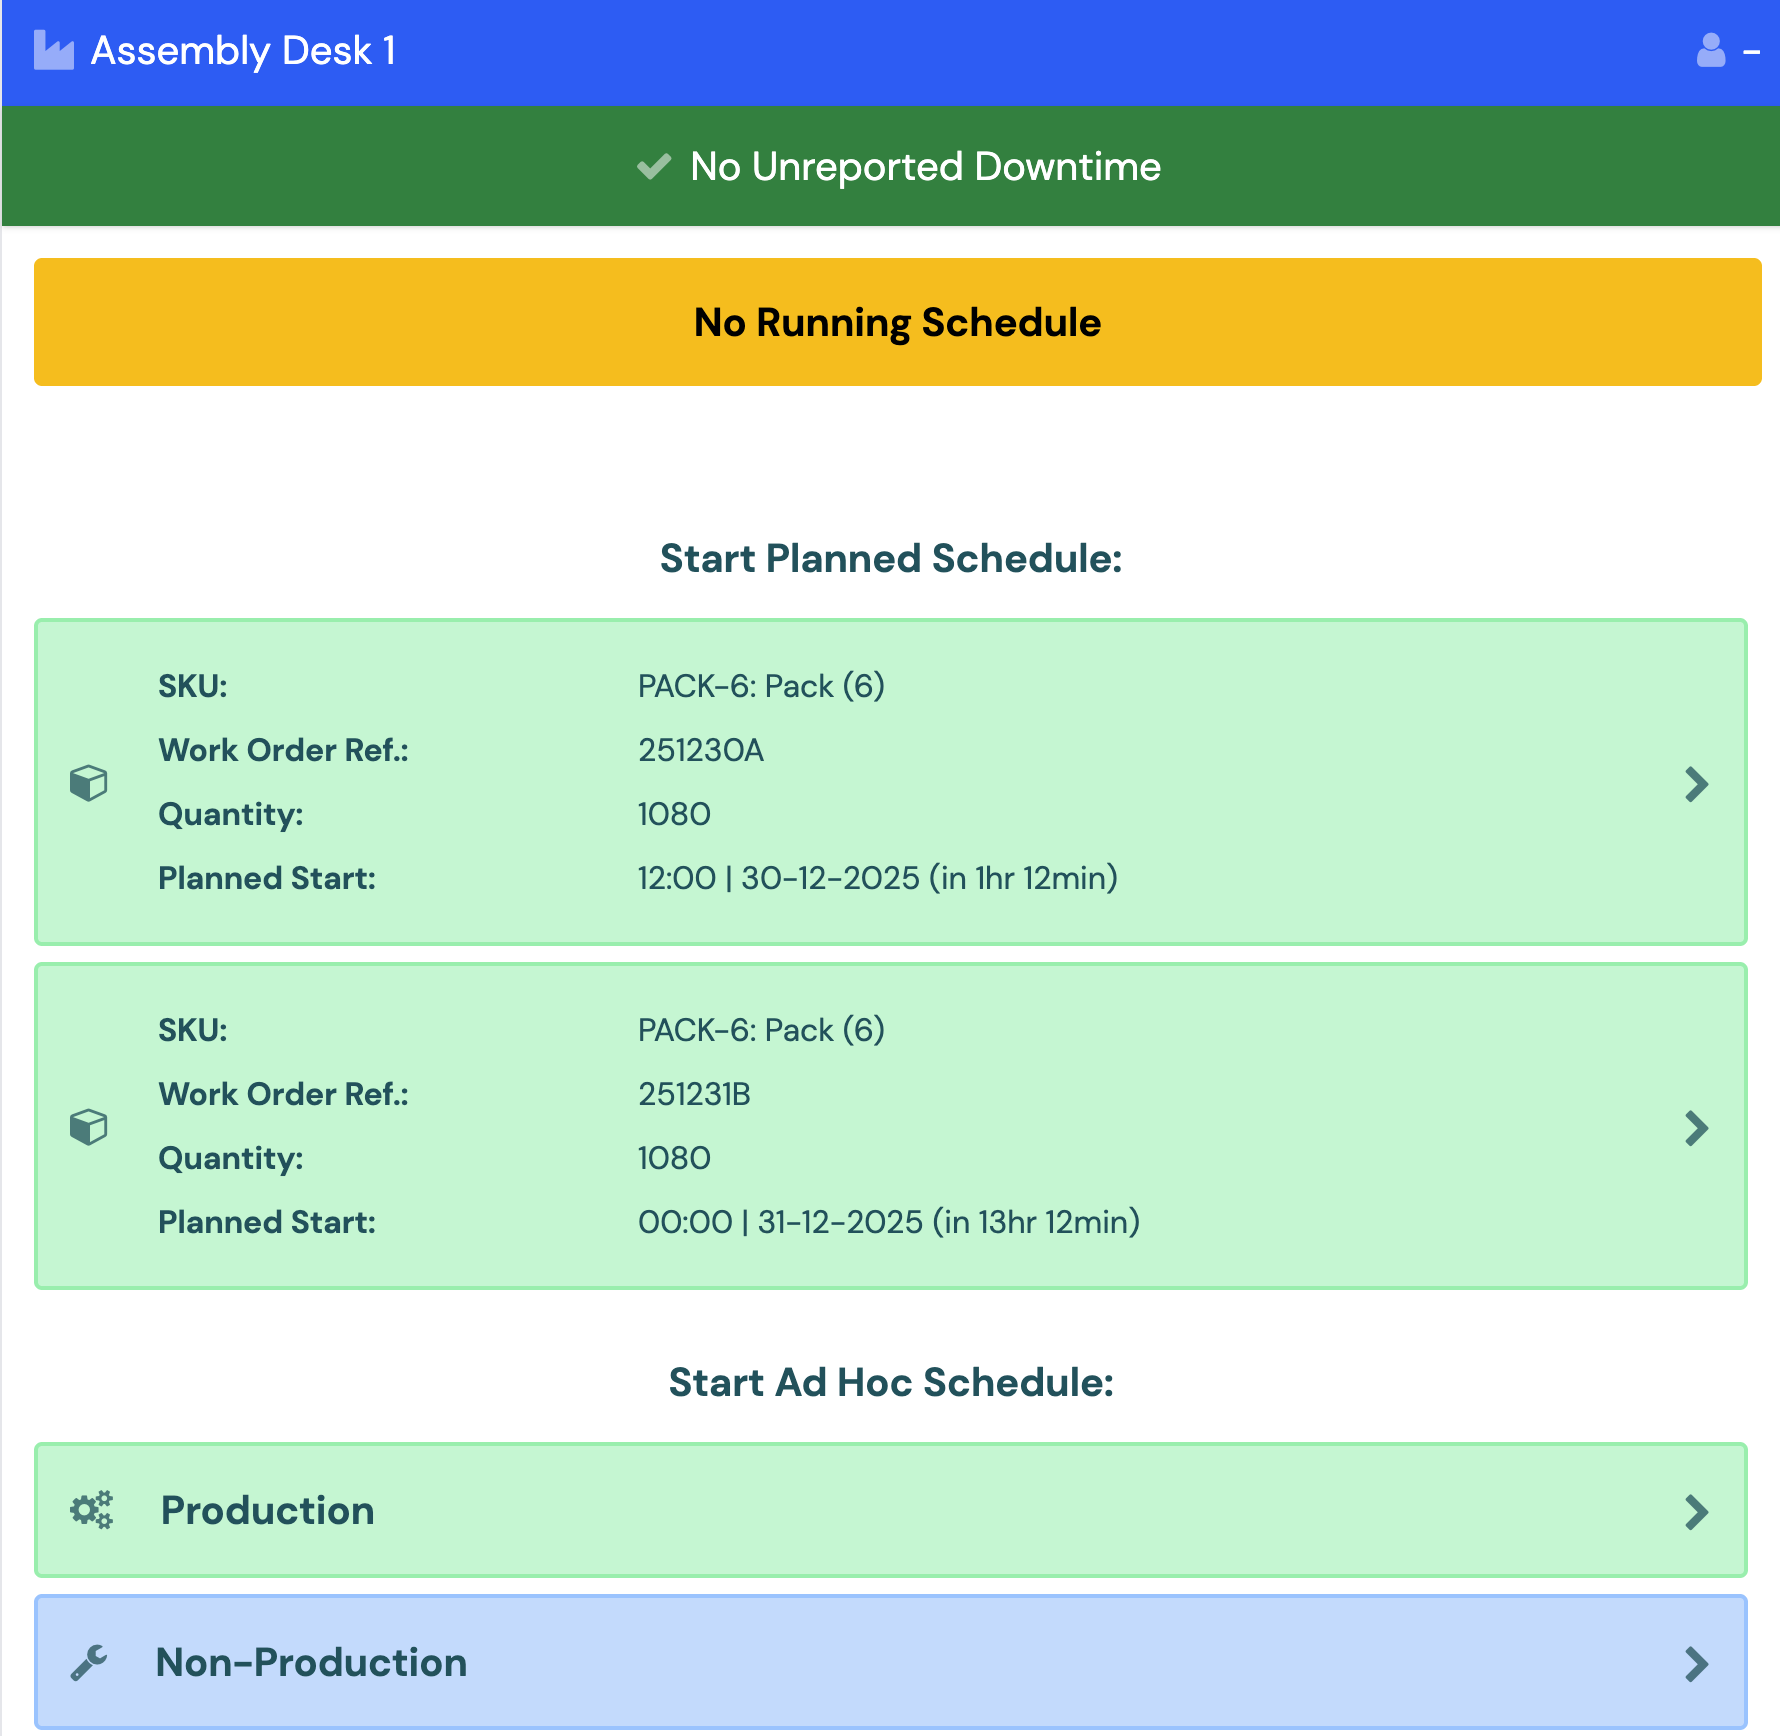
When no schedule is running, the screen lists the station's planned schedules under Start Planned Schedule. Production schedules are green and show the SKU, Work Order Ref., quantity (∞ for a continuous schedule) and planned start. Non-production schedules are blue and show the reason, planned start and planned end. Tap a schedule twice to start it.
Prioritised schedules are at the top of the list, in a brighter green, to show which one to start next.
Where Allow Schedule Station Flexibility is turned on, the list also shows schedules planned for other stations in the group, with their planned station. See Station Group.
Ad hoc schedules
Where the station has Allow Ad Hoc Schedules turned on, operators can also start a schedule that was not planned, under Start Ad Hoc Schedule:
- Production: select the SKU, then optionally enter a target quantity (up to 99,999), a Work Order Reference and, where allowed, parts per cycle. Tap Begin Production.
- Non-Production: select the reason and a duration (End of Day, 2 to 7 days, or Continuous), then confirm with Begin Non-Production.
An ad hoc production schedule has no planned end, so the operator ends it. See Station and Station Group for the setting.
While a production schedule runs
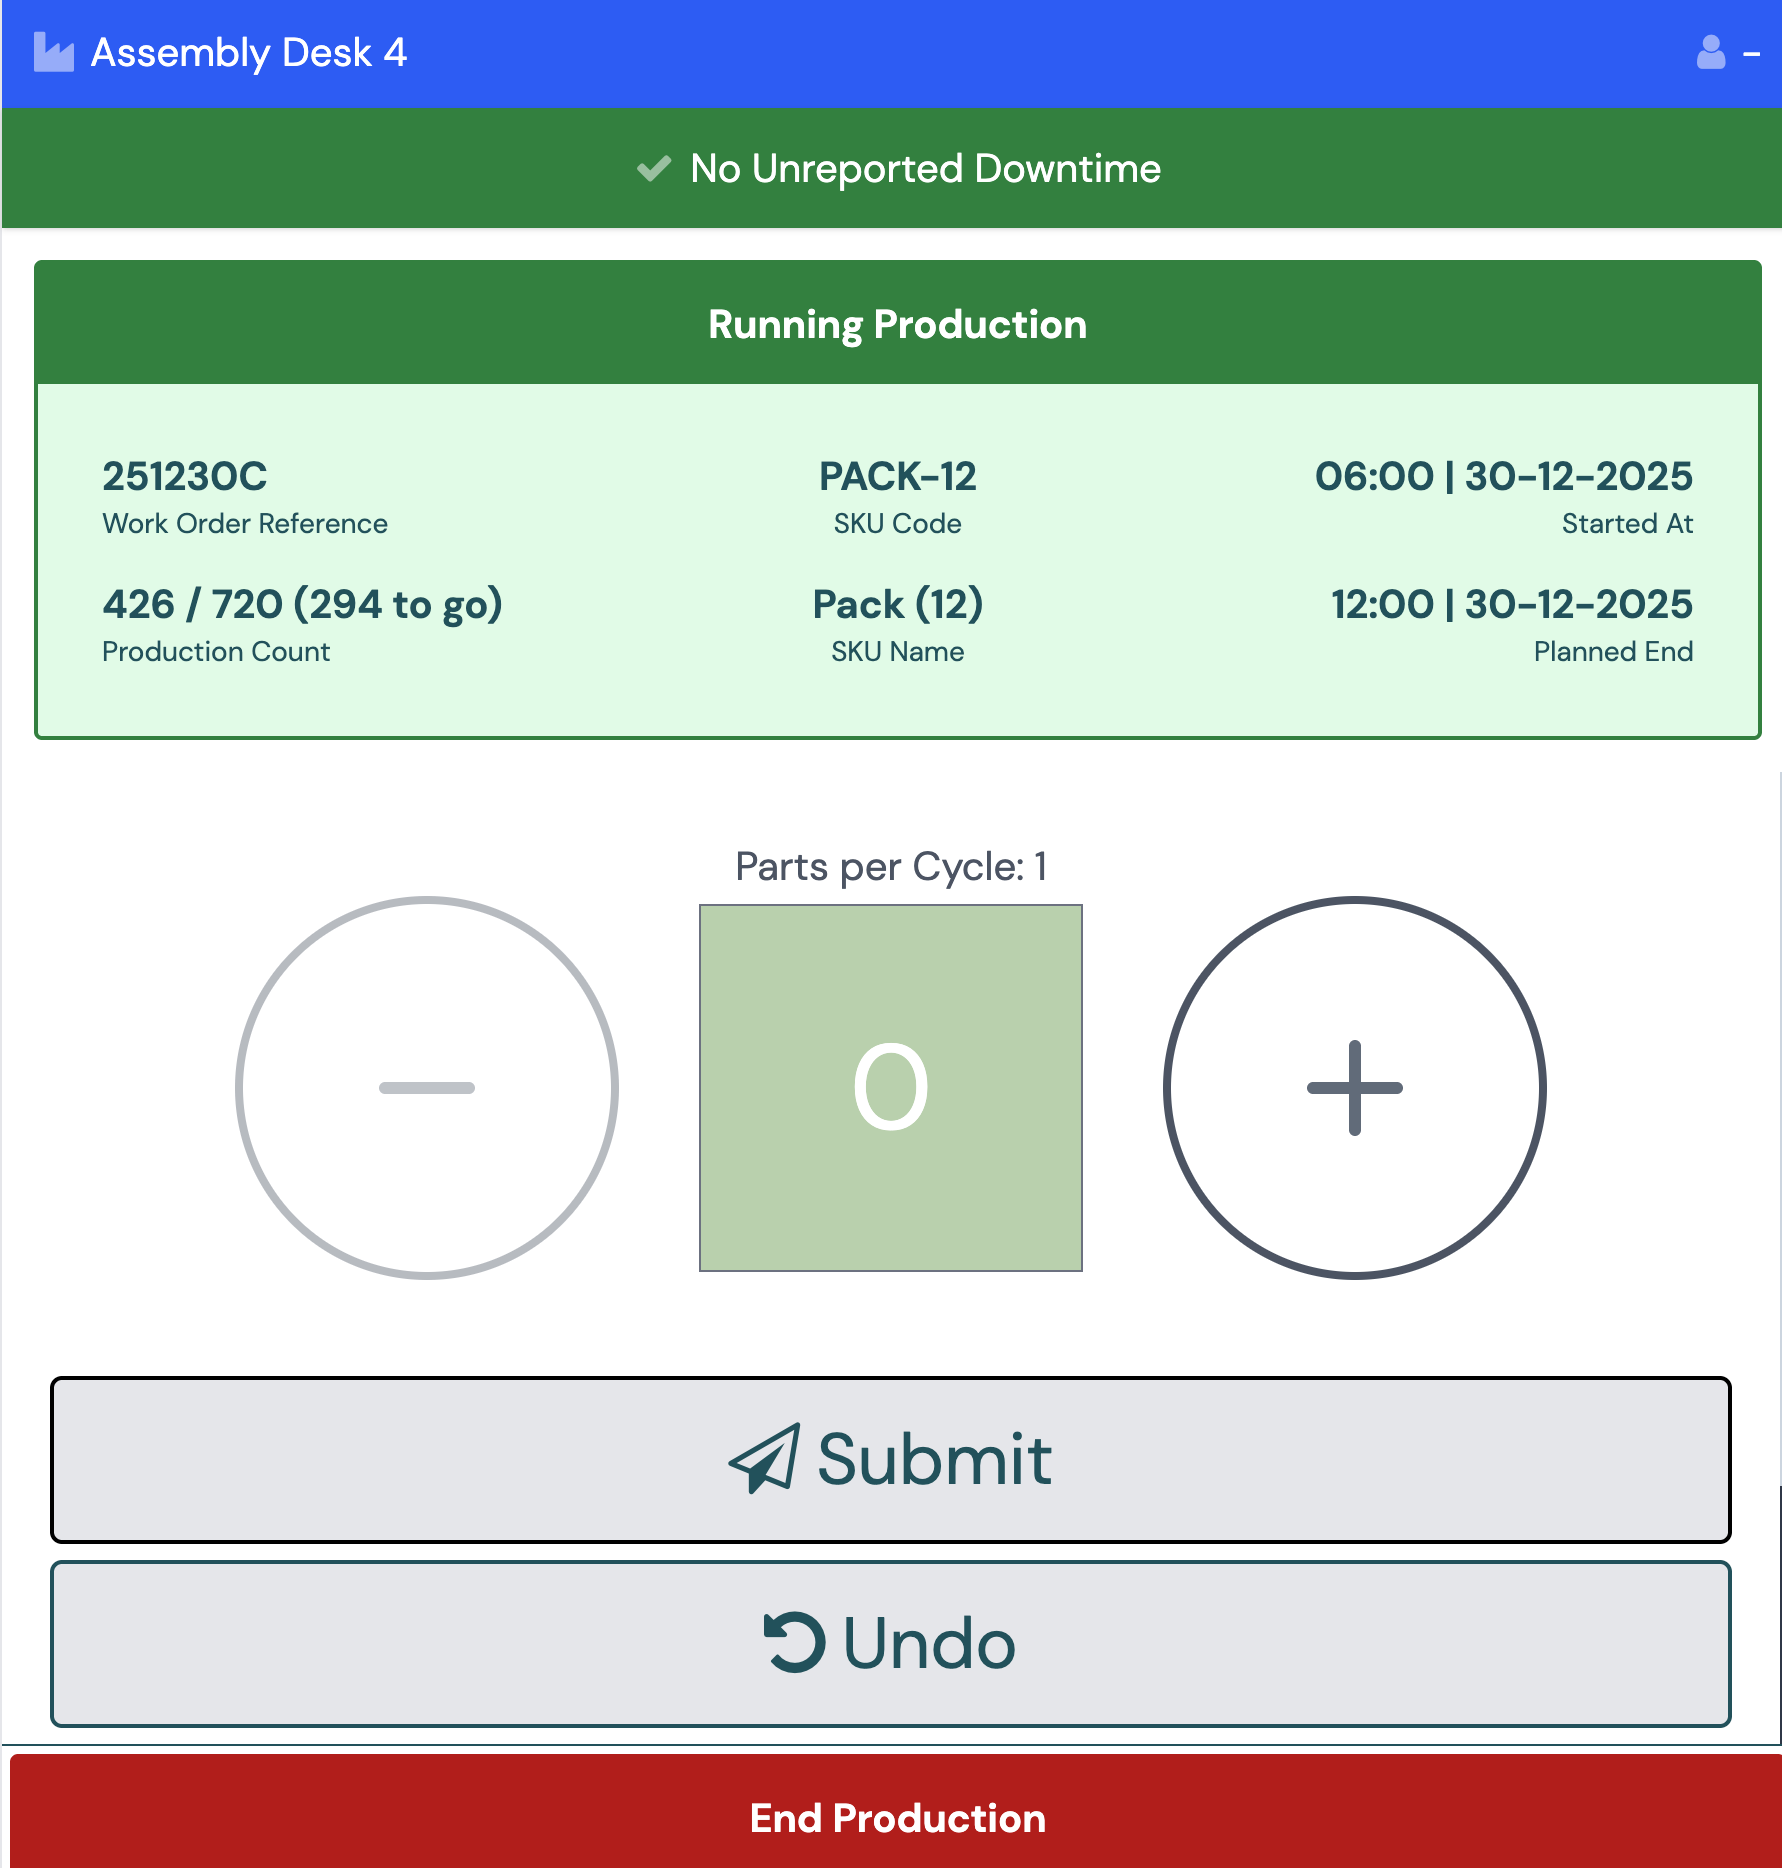
The screen shows the running schedule and, below it, the station's production history for the schedule. The buttons at the bottom are:
- End Production: ends the schedule. If no production has been recorded, or the planned quantity has not been reached, the screen asks you to confirm.
- Cut Short: where the station has Allow Cutting Schedules Short turned on, ends the schedule early. See Scheduling for what cutting a schedule short means.
Counting production
Where a station cannot report production automatically, operators can count it by hand while a schedule runs. Turn this on for the station with Allow Manual Production. It is not available on stations that measure line speed.
Enter the number of units (up to 999 at a time) and tap Submit Production.
Where the station has Allow Rejecting Production turned on, the operator first chooses Good or Bad. For bad units, the operator can pick a quality reason. The reason is optional. See Quality for how bad production and its reasons are recorded.
Correcting production
Where the station has Allow Production Correction turned on, operators can fix counting mistakes on the running schedule:
- Undo Last Production reverses the last manual entry, after the operator confirms. For bad units it is reversed against the same quality reason.
- Correct Production Count opens a screen where the operator adds units to, or takes units from, the good count (or the bad count, where rejects are allowed), then taps Submit Production Correction. The count cannot go below zero.
To correct a schedule that has already ended, see Correcting a finished schedule's count.
Parts per cycle
The screen shows the parts per cycle the schedule is running at. Where the station has Allow Editing Parts Per Cycle turned on, tap it to set a different value. The new value applies to the next cycle only. It cannot be more than the account's maximum production count per schedule. See Account.
While a non-production schedule runs
The screen shows the non-production schedule and an End Now button to end it.
When a station is in a non-production period, from a non-production schedule or declared by a device with the non-production signal, the screen shows a Current Planned Non-Production card with the reason in place of the schedule card. A period declared by a signal has no start or end time, because the device opens and closes it, and the operator has nothing to do.
Giving downtime reasons
When a stop is detected and still has no reason, the Operator Interface opens the reason screen for it straight away. The operator selects a reason and taps Submit.
To give reasons for earlier stops, tap the Unreported Downtimes bar. The screen lists the stops that have no reason; tap one to give its reason.
A reason can be set to require a note. See Reasons. When the operator picks such a reason, the screen asks for a short note before the reason is saved. Back on the note screen returns to the reason list with nothing assigned. The note is shown on the Downtime List and in the downtime CSV export.
How stops are detected, and how long unreported stops stay on the screen, is described in Downtime.
Manual downtime
An operator can mark a station as down, with a reason, even while the machine is still sending signals, for example while maintenance is working on it. What this does to the station's data is described in Downtime.
Turn it on for the station with Allow Manual Downtime. See Station.
- Tap the downtime status bar (Unreported Downtimes or No Unreported Downtime) to open the downtime screen.
- Tap Start on the Click to start Manual Downtime banner.
- Select a reason, add a note if the reason requires one, and confirm with Start Downtime.
While manual downtime is active:
- a banner in the station header shows the reason and how long it has been running;
- the station screen shows only the schedule and an End Manual Downtime button. Manual production entry and production correction are not available.
To end it, tap End Manual Downtime twice. Only one manual downtime can be open on a station at a time. The banner and the End button stay available even if the setting is later turned off, so an open manual downtime can always be ended.
Tasks
Where Tasks are in use, the Pending Tasks bar shows how many Tasks are pending on the station. When a Task becomes pending, and when it is missed, is described in Tasks.
Tap the bar to open the Tasks screen. It has two levels.
Task Lists shows one button for each Task list assigned to the station, with the list's name, description, trigger (Each Schedule, Timer or On Demand) and the number of Tasks pending in it. A button is red while anything in the list is pending and green when the list is clear. Every list is shown at all times. Lists with no Tasks are not shown.
Tap a list to open it. The list's name and description are at the top, with every Task in the list below, in the order set on the Task:
| Tile colour | Meaning |
|---|---|
| Red | The Task is pending. The operator can complete it now. A Timer Task shows its deadline. |
| Green | The Task is completed, with a check and the time it was completed. A completed Task stays green for an hour, then turns grey. |
| Grey | The Task is not pending. It shows when it was last completed, if it ever was. |
A Task that is in two lists appears in each. Completing it in one list does not complete it in the other. Back returns to the list buttons.
To complete a Task, tap a red tile twice. If the Task requires notes, an Add Note to Task step opens first, and the Task is completed only when the note is submitted. Back returns to the list with the Task still pending.
Every list has a Start this List button. Tap it twice to make every Task in the list pending now; the tiles turn red in place. The button reads List Started while every Task in the list is pending. How a run started this way is recorded is described in Tasks.
Task lists are set up in Tasks and Task Lists. Completed and missed Tasks are listed in Task History.
Station notes
Operators can add notes on the station. Notes are seen by other operators on the same station and by desktop users on the Cockpit.
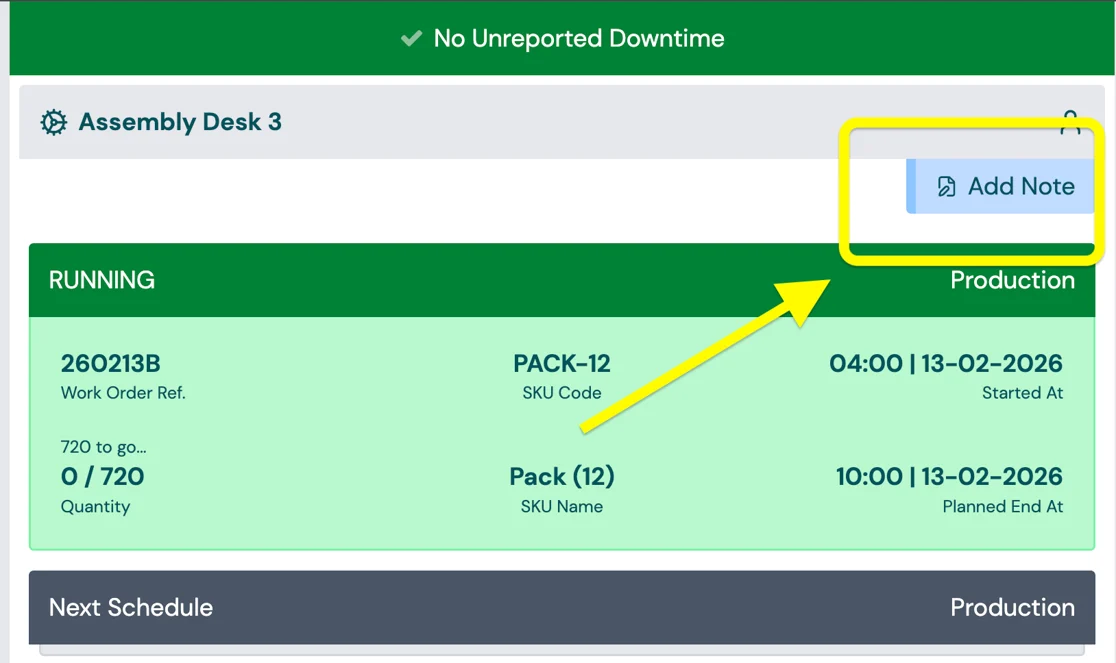
The latest note shows in the station header, with who added it and when. Tap the note to open Station Notes History: the last five notes for the station, newest first, not counting notes hidden on the desktop. Tap Add Note to add a note. Notes added from the desktop have no operator initials.
Station settings
These station settings turn Operator Interface actions on or off. They can be set for the account, plant, station group or station. See Station.
| Setting | Turns on |
|---|---|
| Allow Manual Production | Counting production |
| Allow Rejecting Production | Good and Bad counts, with a quality reason |
| Allow Production Correction | Undo Last Production and Correct Production Count |
| Allow Editing Parts Per Cycle | Changing parts per cycle |
| Allow Ad Hoc Schedules | Ad hoc schedules |
| Allow Cutting Schedules Short | The Cut Short button |
| Allow Manual Downtime | Manual downtime |
| Allow Schedule Station Flexibility | Starting schedules planned for other stations in the group |
Capabilities and metrics
| Capability | What operators do here |
|---|---|
| Downtime | Give reasons for stops, start and end manual downtime |
| Production Tracking | Count and correct production (production count, good count) |
| Quality | Record bad units and their reasons (bad count) |
| Scheduling | Start and end production and non-production schedules |
| Tasks | Complete Tasks (tasks completed, tasks pending) |
FAQs
Why do operators enter initials, and do they have to?
Initials record which operator entered production, downtime reasons, Tasks and notes. They are optional. Initials can be 3 to 8 letters or numbers, so operators with the same two initials can add a third letter or a number to tell themselves apart.