Gantt & Schedules
Gantt & Schedules is where you create, upload, order and prioritise production and non-production schedules for each station. The pages are under Scheduling in the menu: Gantt, Schedules List, Add Schedule and Upload Schedule.
There are two types of schedule:
- A production schedule links a station to a SKU. It can have a planned quantity and a Work Order Ref.
- A non-production schedule links a station to a non-production reason, such as planned maintenance, and always has a planned end.
What schedules mean for your data, and the other ways to create them (from the Operator Interface or through the API), are described in Scheduling.
Gantt
Scheduling > Gantt shows your schedules as bars on a timeline, one row per station, by day, week or month. Use it to view, add, move, resize, edit and delete schedules.
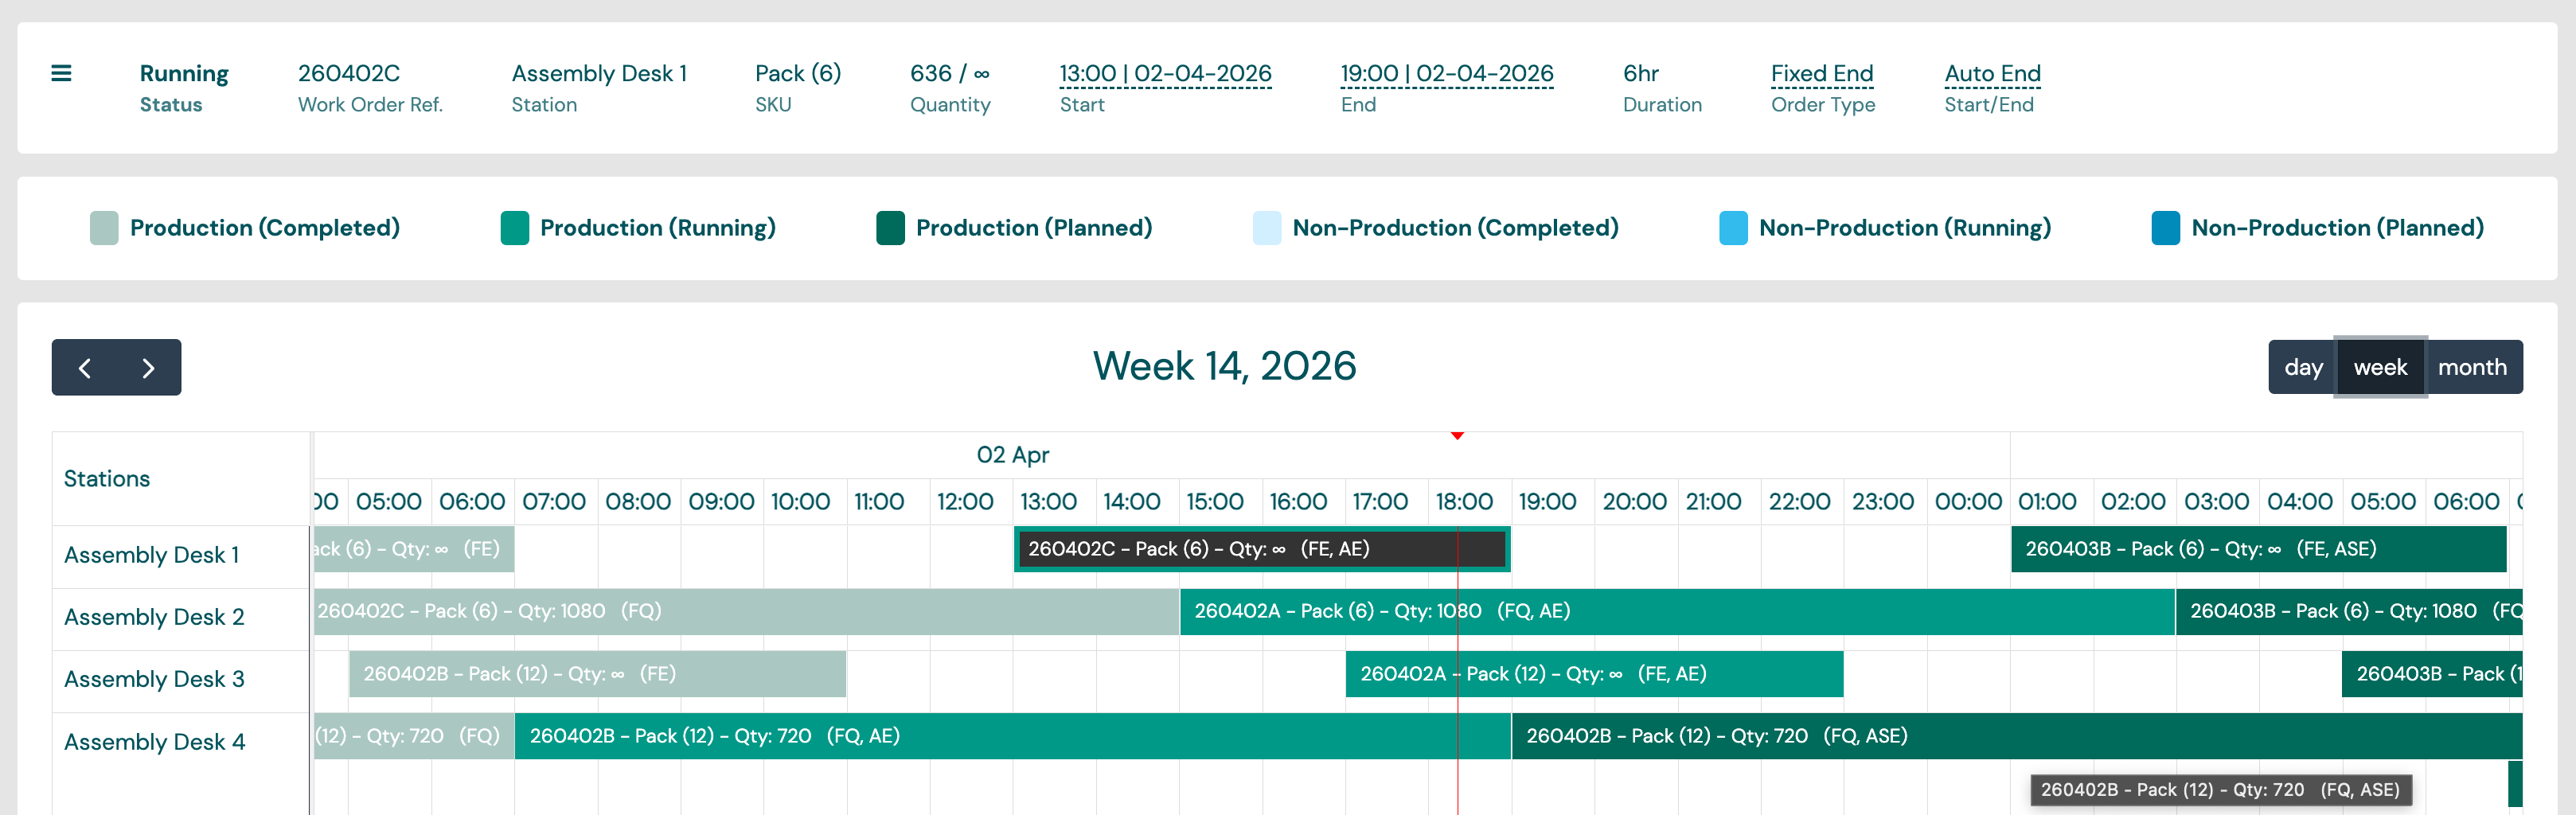
Filter the chart by station. Use the arrows to move between days, weeks or months, and the buttons at the top right to change the view. The chart remembers the last view and date you used.
To find a schedule by its Work Order Ref., turn on search mode and start typing. Search looks across all dates for the plant and shows up to 250 matches.
Colour legend
The legend above the chart shows what each colour means:
| Legend | Colour |
|---|---|
| Prod (Running) | Green |
| Prod (Completed) | Light green |
| Prod (Planned) | Darker green |
| Non-Prod (Running) | Blue |
| Non-Prod (Completed) | Light blue |
| Non-Prod (Planned) | Darker blue |
| Out of Shift | Grey background on the station row |
Order types
How a production schedule can be moved or resized depends on its order type. Each production bar shows its order type as a badge.
| Badge | Order type | Description |
|---|---|---|
| FQ | Fixed Quantity | The schedule has a planned quantity but no planned end. The ideal end time is calculated from the SKU's cycle time. |
| FE | Fixed End | The schedule has a planned end but no planned quantity (a fixed duration). |
| FQE | Fixed Quantity & End | The schedule has both a planned quantity and a planned end. The SKU's cycle time is not used to set the end. |
| C | Continuous | The schedule has neither a planned quantity nor a planned end. The station stays on this SKU until the schedule is ended by hand. |
Start/end mode
Each production schedule that has not ended also shows a start/end mode badge, which says how it will be started and stopped:
| Badge | Mode | Description |
|---|---|---|
| ASE | Auto Start & End | The schedule starts and ends automatically at the planned times, whatever quantity has been produced. |
| AS | Auto Start | The schedule starts automatically at the planned start time. |
| AE | Auto End | The schedule ends automatically at the planned end time, whatever quantity has been produced. |
| M | Manual | An operator must start and end the schedule. |
How far a bar extends
A bar always starts at the schedule's actual start time, or at its planned start time if it has not started. Where it ends depends on the order type and whether the schedule is running:
| State | Bar ends at |
|---|---|
| Not started | The planned end time. For FQ, the ideal end time. |
| Running | The latest of the planned end time, the ideal end time and now. |
| Ended | The actual end time. |
| C (Continuous), running | The edge of the visible time range. |
Taking the latest of the three means a running schedule keeps the end time it was planned for. For example, an FQE schedule planned from 06:00 to 16:45 still spans that whole window once started, even if its quantity would ideally be finished by 12:46. A schedule that runs past its planned end keeps growing instead of stopping short of the current time.
A continuous schedule always extends to the right edge of the visible range, in the day, week or month view.
Hovering over a schedule
Hover over a bar to see its Work Order Ref., SKU, quantity (∞ for continuous), order type and start/end mode.
Click a bar to open its detail panel. Hover over a start or end time with a dashed underline to see:
- Actual Start: when the schedule started;
- Actual End: when the schedule ended;
- Ideal End: when the schedule should end, based on production speed.
Hover over the order type or start/end mode badge to see its full description.
Adding a schedule on the Gantt
Click and drag across empty space on a station's row to add a schedule there. The dragged range fills in the start and end, and you can change both in the dialog. Choose Production or Non-Production:
- Production: order type (Fixed Quantity & End by default), SKU, quantity and Work Order Ref., depending on the order type. The schedule waits for an operator to start it.
- Non-Production: the reason. The schedule starts and ends at the planned times.
A schedule cannot start in the past. For other options, such as cycle time overrides or auto end, use Edit on the new schedule or the Add Schedule form. Adding on the Gantt is not available in search mode.
Moving a schedule
Drag a schedule from its centre to change when it starts. Times snap to 15-minute steps, and a schedule cannot be moved into the past.
| Order type | What happens when you drag a schedule that has not started |
|---|---|
| FQ (Fixed Quantity) | The schedule moves to the new start time. The expected duration stays the same. |
| FE (Fixed End) | Start and end move together. |
| FQE (Fixed Quantity & End) | Start and end move together. |
| C (Continuous) | The start time moves. The bar still extends to the edge of the visible range. |
If the schedule starts or ends automatically, the automatic times move with it.
Running and completed schedules cannot be dragged. Once a schedule has started, its start time is fixed.
A schedule stays on its station unless the account setting Allow Drag Between Stations on Gantt is turned on. Then you can drag a schedule that has not started to another station in the same station group. See Account.
Resizing a schedule
Drag the start or end edge of a schedule to make it longer or shorter. Times snap to 15-minute steps.
| Order type | Not started: start edge | Not started: end edge | Running: end edge |
|---|---|---|---|
| FQ (Fixed Quantity) | Not allowed | Not allowed | Not allowed |
| FE (Fixed End) | Changes the start time | Changes the end time | Changes the end time |
| FQE (Fixed Quantity & End) | Changes the start time | Changes the end time | Changes the end time |
| C (Continuous) | No resize handles | No resize handles | No resize handles |
For an FQ schedule, the message reads: "Cannot change the duration of a 'Fixed Quantity' type schedule. To move the start time, drag from the centre of the box." The start edge of a running schedule cannot be moved: "Cannot change the start time of a running schedule." Completed schedules cannot be resized.
If the schedule starts or ends automatically, the automatic times change with it.
Confirming a change
After you drag or resize a schedule, a dialog shows the start and end times before and after the change. Nothing is saved until you confirm. If the schedule starts or ends automatically, the dialog says so:
- "This schedule will start and end automatically when planned." (ASE)
- "This schedule will start automatically when planned." (AS)
- "This schedule will end automatically when planned." (AE)
Editing a schedule
Click a schedule to open its detail panel, then click Edit to open the full form.
- Not started: all fields can be changed.
- Running: the start time is fixed. Everything else can be changed.
- Completed: the schedule cannot be edited.
The detail panel's menu has the same actions as the Schedules List.
Deleting a schedule
Right-click a bar to delete its schedule. A dialog names the schedule by its station, its SKU (or non-production reason) and its Work Order Ref. where it has one. Choose Delete to go ahead or Cancel to keep it.
You can delete any schedule, including one that has started or finished. Production and downtime already recorded against it are not removed. Read-only users cannot change or delete schedules on the Gantt. To delete several schedules at once, use bulk delete on the Schedules List.
Adding a schedule
Scheduling > Add Schedule opens the full schedule form. It has a Production tab and a Non-Production tab. The Add Schedule button on a Cockpit station row opens it with the station already selected.
Production schedule
| Field | Description |
|---|---|
| Station | The station to schedule. |
| Individual SKU | The SKU to produce. Only SKUs allowed on the station are listed. See SKU. |
| Override | Optional values used for this schedule instead of the SKU's: the performance target that matches the SKU's performance mode (cycle time in seconds, units per minute, units per hour or movement speed), and parts per cycle. |
| Work Order Ref. | Optional. Schedules with the same reference are grouped in Production by WO Ref. |
| Planned Start | When the schedule is planned to start, in the station's time zone. |
| Order Type | Fixed Quantity, Fixed End, Fixed Quantity & End or Continuous. See Order types. |
| Actual Start | When Started by Operator (the default): an operator starts it from the Operator Interface. Start at Planned Start: it starts automatically at the planned start. Automatically Start and End when Planned: it starts and ends at the planned times; offered for Fixed End and Fixed Quantity & End. |
| Qty | The planned quantity. Needed for Fixed Quantity and Fixed Quantity & End. |
| Planned End | Needed for Fixed End and Fixed Quantity & End. It must be after the planned start. |
| Extend Shift | Lets the schedule run and record production outside shift times. Enter a start or end outside the shift and select Yes. |
| Auto End On Quantity Complete | Fixed Quantity only. The schedule ends when the planned quantity is reached. The default comes from the account setting Auto-End on Quantity Complete. |
If the account has a maximum production count per schedule, the form refuses a parts per cycle (the override, or the SKU's own) above it. See Account.
Non-production schedule
| Field | Description |
|---|---|
| Station | The station to schedule. |
| Reason | The non-production reason. Only reasons allowed on the station are listed. See Reasons. |
| All Day | Schedules whole days, 00:00 to 24:00. |
| Planned Start | When the period starts. |
| Planned End | When the period ends. Required. |
| Actual Start | When Started by Operator, or Automatically Start and End when Planned. |
A non-production schedule that starts and ends automatically takes over from a running production schedule when it starts.
Rules for all schedules
- A new schedule cannot start in the past.
- A schedule that has ended cannot be changed.
- A production schedule cannot be changed into a non-production schedule, or the other way round.
- If you add a schedule with the same station, SKU (or reason) and planned start as an existing one, it updates the existing schedule instead of adding a second one. A schedule with the same station, SKU and Work Order Ref. but a different planned start is a separate schedule.
Prioritising a schedule
When plans change at short notice, you can mark a schedule as the one to run next without changing its planned start.
Choose Prioritise from a production schedule's menu, on the Schedules List or in the Gantt detail panel. The schedule moves to the top of the station's list in the Operator Interface, in a brighter green, so the operator can see which schedule to start next. If several schedules are prioritised for the same station, they are all at the top of the list.
To take the priority off, choose Remove Priority. The schedule goes back to its place by planned start. A schedule can only be prioritised before it starts.
Schedules List
Scheduling > Schedules List shows schedules as a table, with their status, station, SKU (or reason), Work Order Ref., quantity, start, and duration or end.
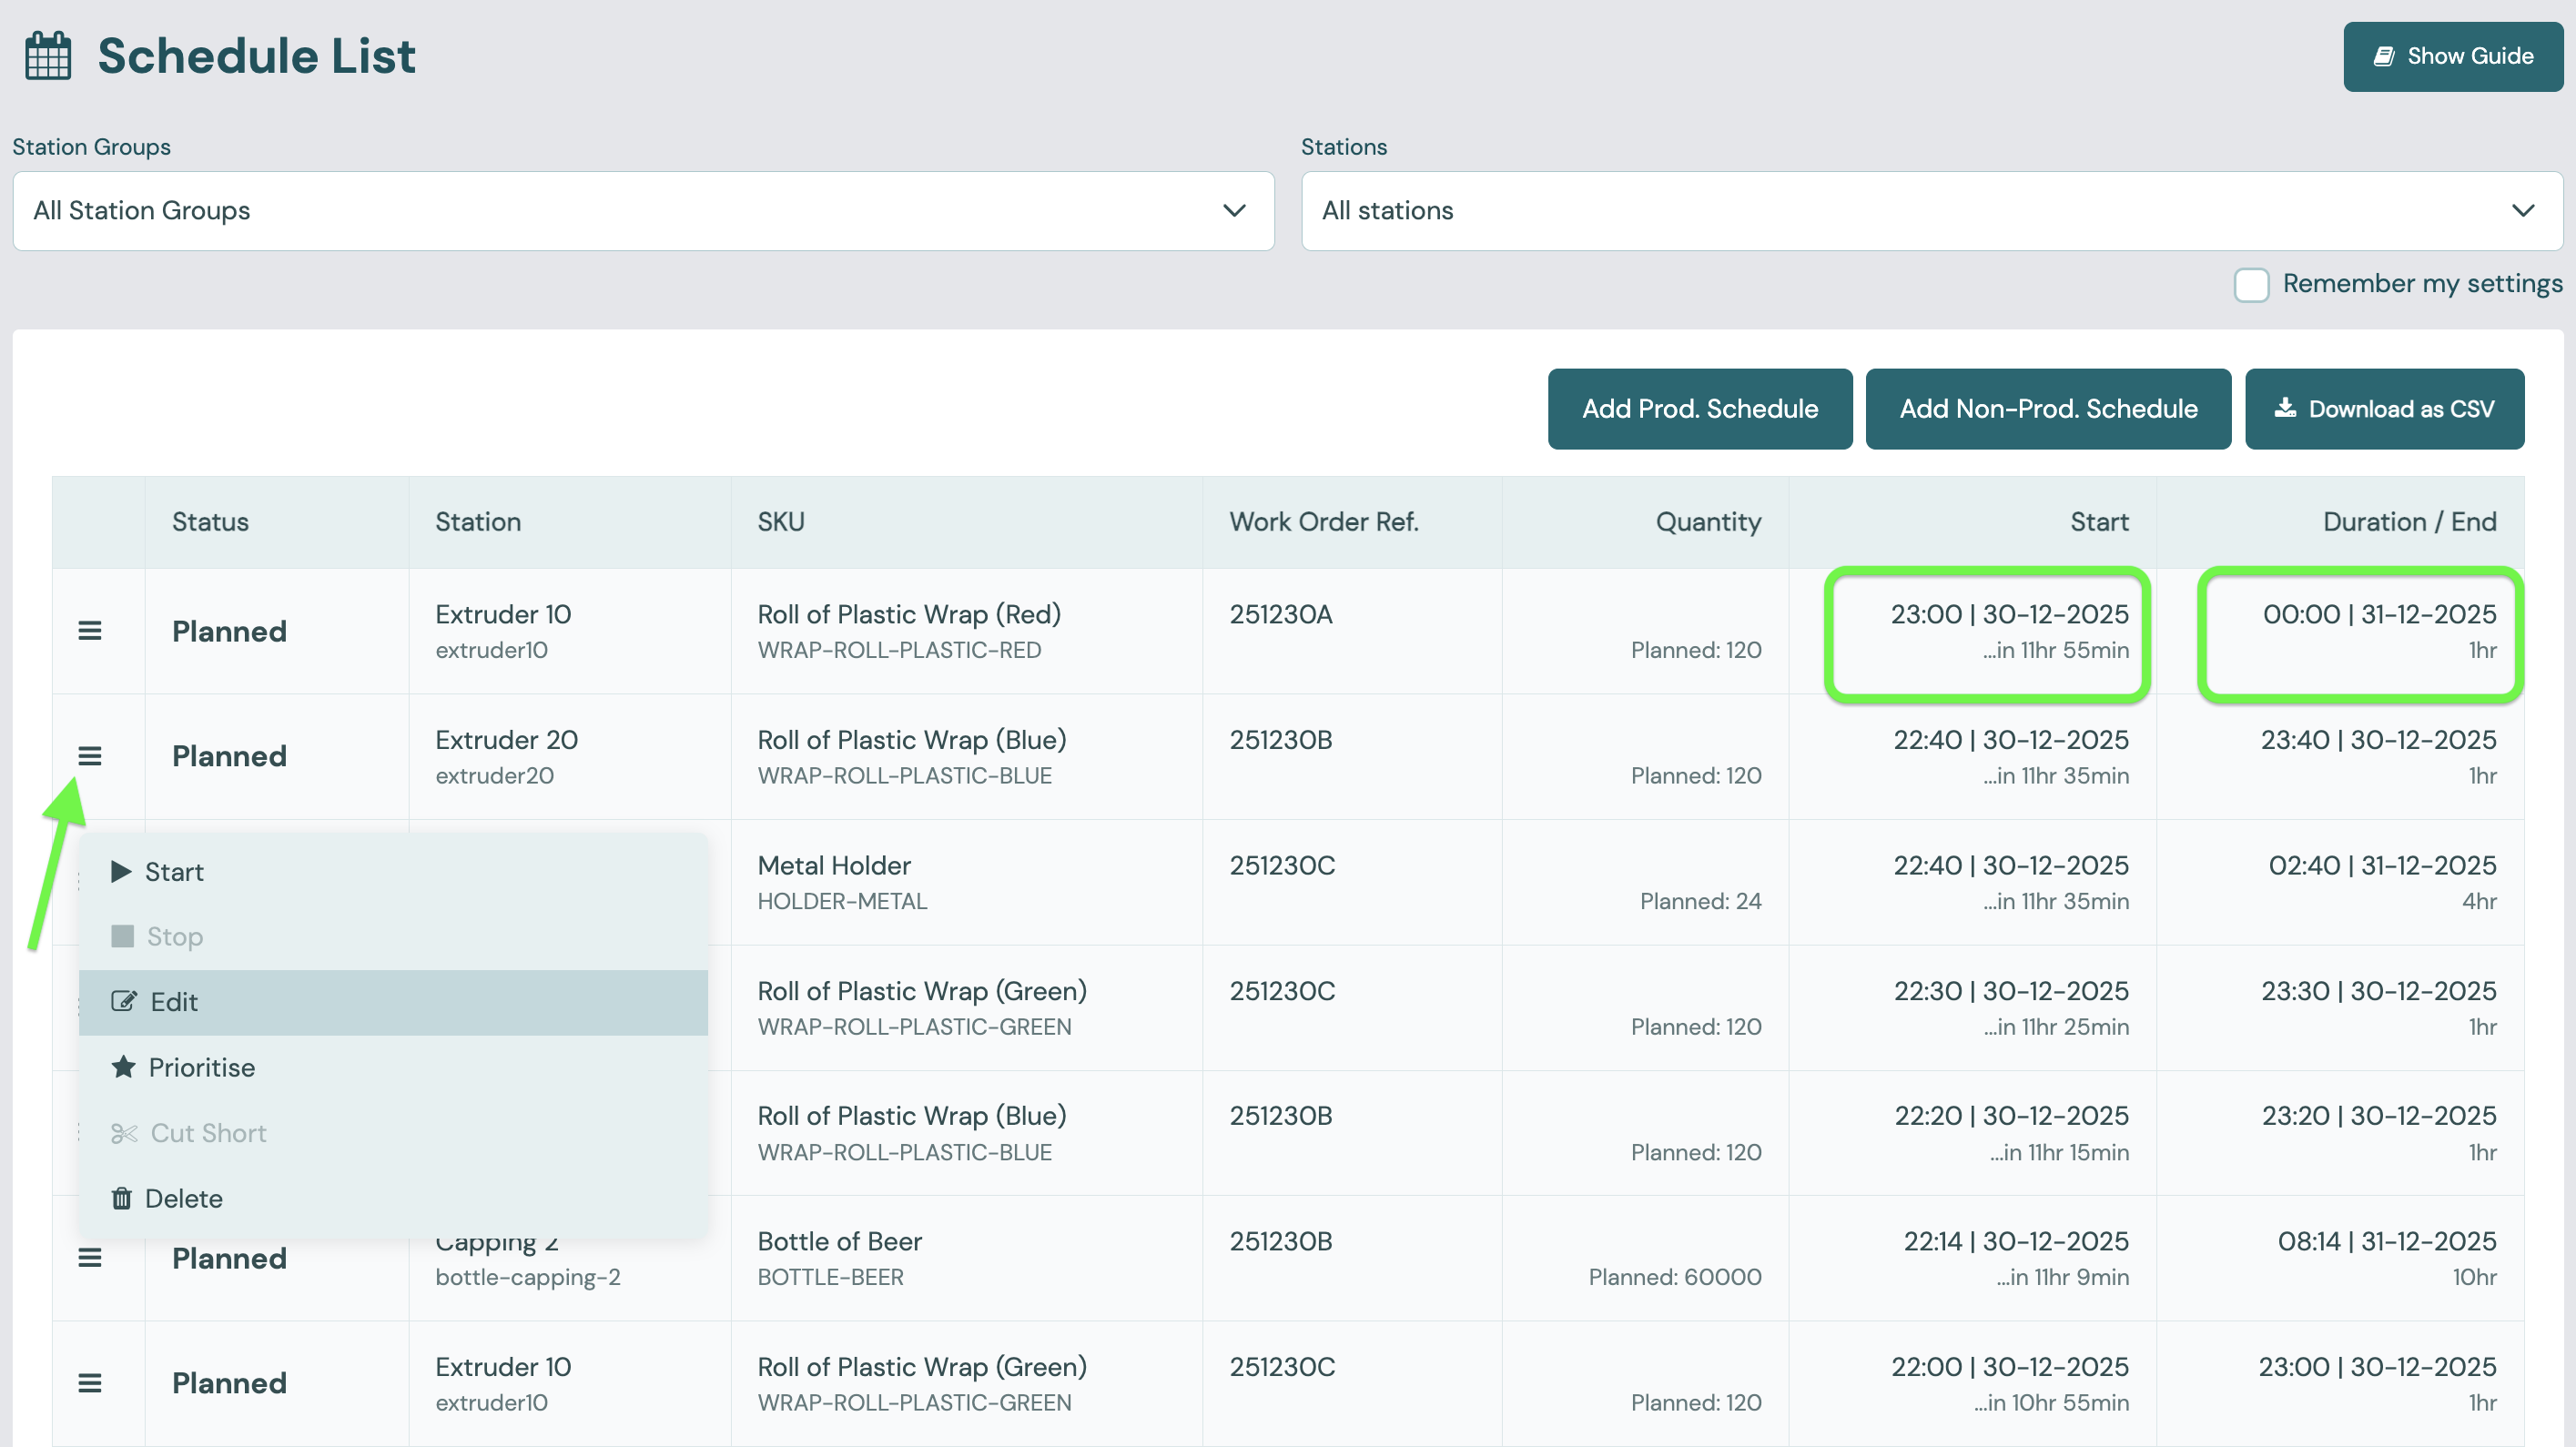
- Filter by station, by date range (a day, week or month, including future ones; today by default) and by Schedule Status (Planned, Running, Completed).
- Search by Work Order Ref. across all dates, as on the Gantt.
- Order: prioritised schedules first, then planned, running, completed and deleted schedules.
- Download the list as a CSV file.
- Add Schedule opens the Add Schedule form.
Schedule menu
Open the menu at the left of a schedule to:
| Action | What it does |
|---|---|
| Start | Starts a schedule that has not started. |
| Stop | Ends a running schedule. |
| Edit | Opens the schedule form. Not available once the schedule has ended. |
| View Production | Opens the schedule's production entries. For running and completed production schedules. |
| Prioritise / Remove Priority | See Prioritising a schedule. |
| Cut Short | Ends a running production schedule early. Needs Allow Cutting Schedules Short on the station. |
| Correct Production Count | See Correcting a finished schedule's count. |
| Delete | Deletes the schedule, after you confirm. |
Deleting schedules
Every delete asks you to confirm first.
One schedule. Choose Delete from the schedule's menu. A dialog names the schedule by its station, its SKU (or non-production reason) and its Work Order Ref. where it has one. Choose Delete to go ahead or Cancel to keep it. The same dialog appears when you delete from the Gantt chart or from a schedule's detail panel.
Several at once. Start Bulk Delete adds a tick box to each row. Tick the schedules you want to remove. Deleted schedules cannot be ticked. The button counts your selection. Pressing it asks "Are you sure you want to delete X schedules?" once for the whole set. Cancel there deletes nothing and clears your ticks. Cancel Bulk Delete leaves the list as it is.
Deleting a schedule that has already run does not remove the production and downtime recorded against it. They stay with the deleted schedule.
Correcting a finished schedule's count
Correct Production Count fixes the production count of a schedule that has already ended. For example, an operator entered a unit correction against the wrong figure and doubled the schedule's quantity.
The action is in the schedule's menu, on the Schedules List and in the Gantt detail panel, when all of these are true:
- the account has Allow Historical Production Correction turned on;
- you are signed in as an admin (API keys cannot make this correction);
- the schedule is a production schedule that has ended and has not been deleted;
- it ended within the last month.
The dialog first shows the schedule you are correcting: station, SKU, Work Order Ref., start and end, and its current production count. Check that it is the right schedule and work out the amount. Set the switch to + (the default) to add to the schedule's good count, or to − to take away from it, then enter the amount. A schedule cannot be corrected below zero. If a correction is refused, the dialog stays open with your entry so you can change it and submit again.
Each correction is recorded as its own entry on the Production Entries page, showing only the amount of that correction. For example, correcting a schedule by −14, then −5, then +12 gives three entries, and reduces the schedule's count by 7 overall. The entries appear at the schedule's end time, in the order they were made. The zero limit is checked against the count the schedule shows now: a schedule showing 8 after a −20 correction accepts a further −8 and refuses −9. A schedule can have up to 100 corrections.
The correction is applied immediately. Busroot then rebuilds the station's data, so that OEE and the reports built on it use the corrected count. For a schedule that ended recently this takes a few minutes. For one near the one-month limit it takes longer.
This is for fixing a wrong total, not for recording quality: corrections only change the good count, never the split between good and bad. It is separate from Allow Production Correction, which lets operators correct a running schedule in the Operator Interface.
Uploading schedules
Scheduling > Upload Schedule adds many schedules at once from a CSV or XLSX file. It has a Production tab and a Non-Production tab.
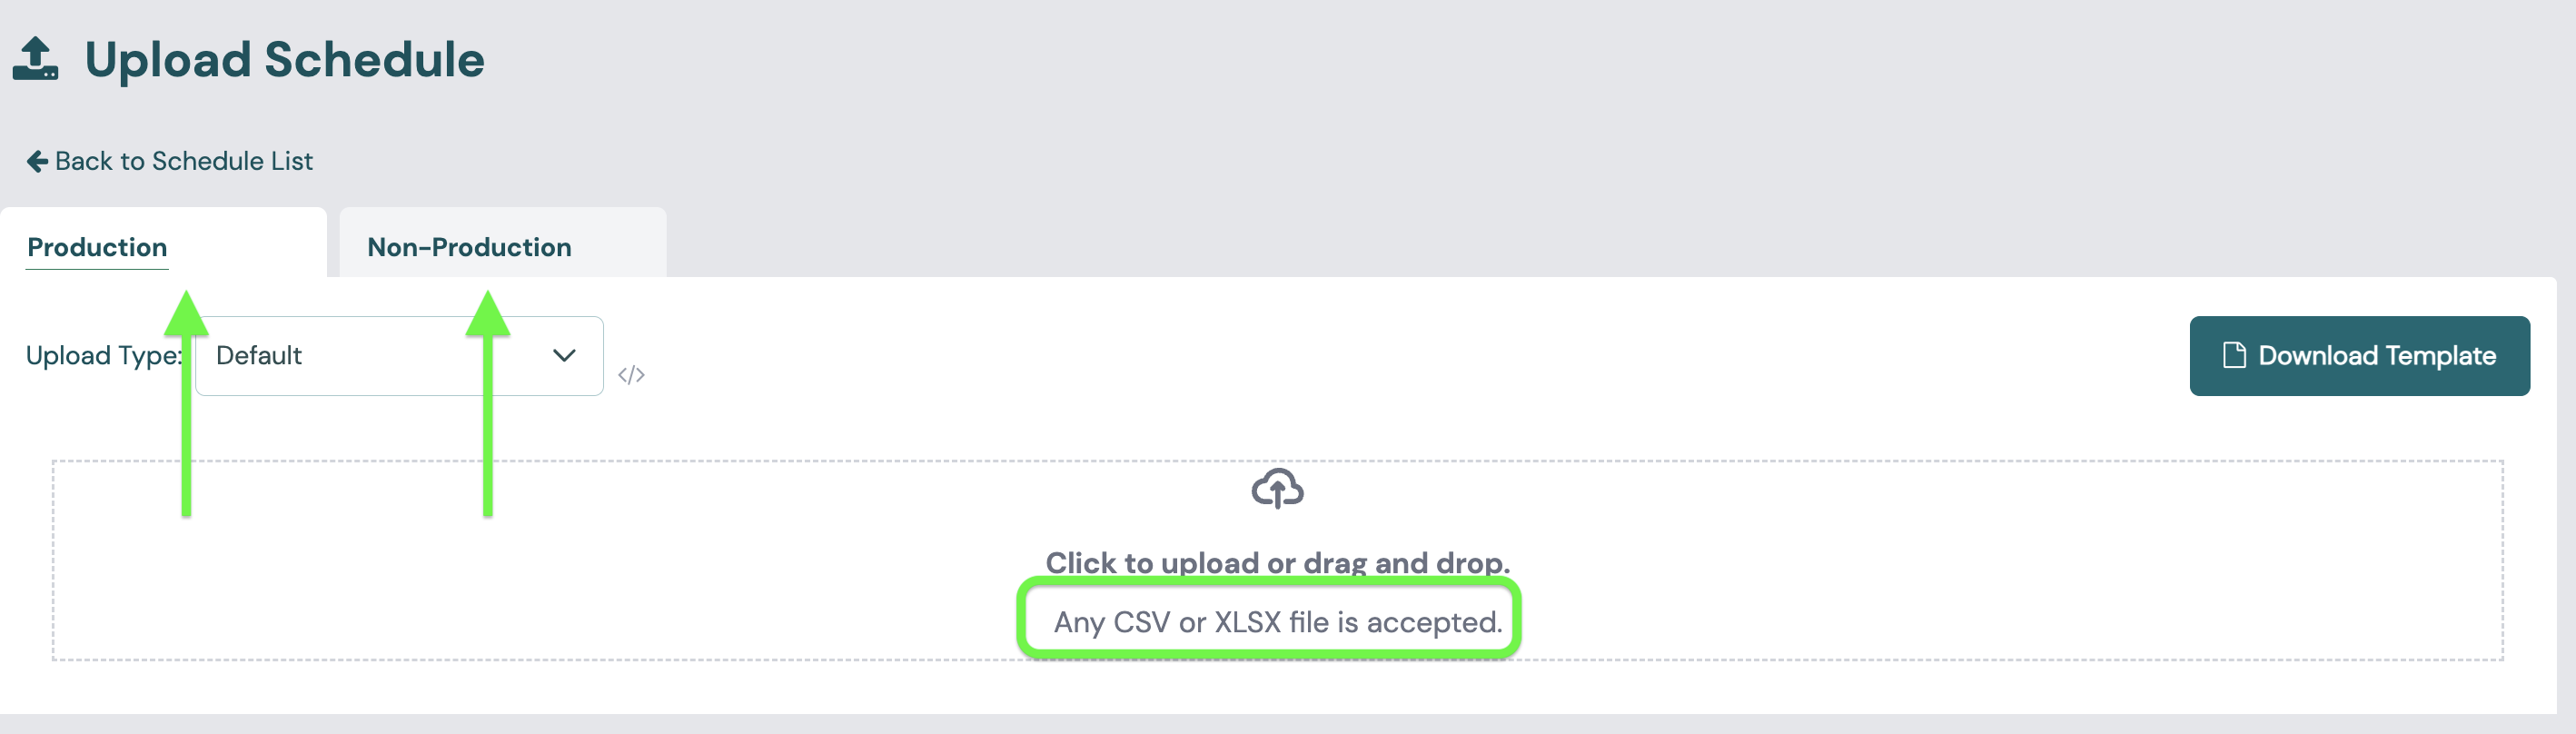
- Choose the Production or Non-Production tab.
- Click Download Template to get a CSV file with the columns and an example row.
- Fill in one row per schedule and upload the file. Busroot shows the rows it read, and marks any row with a problem.
- Click Upload Schedules. Busroot reports how many schedules were added or updated, and lists each row that failed with the reason.
Production columns
| Column | Required | Notes |
|---|---|---|
| stationCode | Yes | The station's code. See Station. |
| skuCode | Yes | The SKU's code. If the SKU does not exist, Busroot creates it. |
| plannedStartAt | Yes | In the format shown in the template, for example 01/01/2026 14:00. |
| plannedEndAt | No | Same format. |
| plannedQuantity | No | If you leave both the quantity and the planned end blank, the schedule is Continuous. |
| workOrderReference | No | A reference for the schedule, or one shared by several schedules to group their production. |
| workOrderItemReference | No | A unique reference for each row. When you upload again, rows whose reference already exists are ignored, so schedules are not duplicated. |
| cycleTime | No | A cycle time for this schedule only, used instead of the SKU's or station's. |
| partsPerCycle | No | Parts per cycle for this schedule only, used instead of the SKU's or station's. |
Uploaded production schedules wait for an operator to start them.
Non-production columns
| Column | Required | Notes |
|---|---|---|
| stationCode | Yes | The station's code. |
| nonProductionReasonCode | Yes | The reason's code. See Reasons. |
| plannedStartAt | Yes | In the format shown in the template. |
| plannedEndAt | Yes | Same format. |
| actualStartAt | No | If set, the schedule starts automatically at this time. |
| actualEndAt | No | If set, the schedule ends automatically at this time. |
Leave the id column blank: Busroot creates it.
How rows are read
- Default reads the template's column names, and also common headings such as "Station", "Planned Start", "SKU", "Work Order Ref." and "Quantity". Dates can be
DD/MM/YYYY,DD-MM-YYYY, either of those withHH:mm,YYYY-MM-DD HH:mmor ISO 8601. - As is reads the column names exactly as they are in the file.
- If your planning system exports a different layout, send an example file to support. They can add a format for your account, which then appears as an option on the page.
A row fails if its station does not exist in Busroot, if a required value is missing, or if it would start a new schedule in the past. A row with the same station, SKU (or reason) and planned start as an existing schedule updates that schedule.
Capabilities and metrics
| Capability | What these pages show or set |
|---|---|
| Scheduling | Production and non-production schedules, which set scheduled production time and scheduled non-production time |
| Production Tracking | Planned quantities and targets, which drive schedule progress and target count; the production count of finished schedules |
To see how much shift time is already scheduled, use Schedule Capacity.